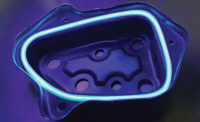
When dispensing form-in-place gaskets—for example, on the die-cast housing of an automotive control unit—it’s important to apply the material precisely along the contour of the part. On the housing, the contour runs partly in a straight groove, partly around corners and screw locations and partly along various radiuses. In the area where the plug housing will be installed, the material often must be applied on a ramped surface. All this makes consistent, gap-free dispensing difficult.
The new DC803 Dispensing Cell from Scheugenpflug GmbH promises to make the process faster, easier and more reliable.
Even data import is simple. A CAD file for the part can be imported directly into the system. The Upic5 editor enters the DXF file for the dispensing path directly and automatically generates the NC block. Application of the material can then start immediately.
To ensure that the material is applied evenly, the dispensing speed must be adjusted to the current contour section. Scheugenpflug’s new software function allows the dispensing speed to be adapted to the gantry speed. Since the gantry can accelerate on straight sections, dispensing speed is automatically increased at the same time. Similarly, the gantry slows down along tight radiuses, so dispensing is adjusted to prevent material from accumulating. The process time can be significantly reduced as a result of this direct link. In some applications, it is reduced by up to 50 percent.
To ensure optimum and traceable quality, vision systems are used to check the width, position and uninterrupted application of the sealant during application. There is no need for a separate inspection station, which saves money and cycle time.
Vision sensors are mounted directly on the dispensing head above the nozzle. Inspection is performed in real time as the sealant is applied, so plant personnel know immediately whether part is good or not good.
Inspection with RTVision is available with 2D or 3D sensors. The 2D sensor uses an LED light source to detect the width and continuity of the application by contrasting the bead with the background. The 3D sensor uses six lasers as the light source to evaluate the third dimension, height, as well.
User-friendly software lets engineers easily enter the parameters for good parts and bad ones. Detailed visualization means that the status is instantly visible.
In response to a request by a major automotive supplier, Scheugenpflug recently set up a fully automated assembly line for a control unit for an electric vehicle. The supplier wanted a compact line and a cycle time of less than 30 seconds. This was achieved by combining adaptive dispensing speed with real-time inspection within the dispensing cells.
In the first cell on the assembly line, a precise bead of heat-conductive adhesive is applied to the die-cast housing along a meandering path and inspected simultaneously with 2D RTVision sensors. The position of the bead and its width can be accurately monitored to ±0.2 millimeter.
Next, a silicone seal is applied to the housing in a recess for the plug housing. The necessary ramps are achieved with a gear dispensing head with integrated swivel needle. An RTVision 3D sensor determines the position, width and height of the seal and any possible interruptions with no additional processing time.
After the PCB has been joined to the plug housing and automatic screwdriving has been completed another silicone seal is placed in the surrounding housing groove and over the plug housing. At the end of the dispensing process, the material is sucked back from the gear dispensing head to ensure a perfect end to the bead. The liquid seal is once again inspected with the 3D sensor. The position of the bead and its width can be accurately monitored to a tolerance of ±0.1 millimeter. Height discrepancies of more than ±0.15 millimeter can be detected.
Finally, the top is added and connected by a crimping process.
All steps—dispensing, sealing, screwdriving, crimping and testing—are accomplished on the fully automated line.
For more information, click here.


